Thursday, March 21, 2013

New Blooms and A New Goal

The reason I love roses so is because of their long bloom time.  In my garden, they bloom from March through November.  In fact, the first rose has begun to bloom.  This year, Carefree Beauty:

Carefree Beauty

and Sweet Drift:

Sweet Drift

tied for first bloom of the year.

It took me a long time to appreciate blooms that only last for a few days or weeks.  I wanted every plant to bloom as long as my roses!  But I have slowly begun to appreciate the short season of blooms from other plants.  A garden where every plant is in bloom every season is just not feasible!

I now love seeing the different blooms as the seasons change, and how that changes my garden.  For instance, this phlox that's blooming along with the muscari is, in my opinion, perfect.


The muscari would be nice on its own, and the phlox would be nice on its own, too.  But together, they make this area a masterpiece of beauty for a small amount of time.


Seeing this area has given me a new goal:  To make each area of my garden perfectly beautiful - no matter how short that time may last.

I'm joining Tootsie Time for Fertilizer Friday.


Tuesday, March 19, 2013

Garden Book Reviews March 2013

When does a book become a classic?  I'm not sure, but I have a couple of classic gardening books to recommend this month.  Both are for rose lovers.


The first book, In Search of Lost Roses by Thomas Christopher is a small book that is full of many tales, all of them about roses.  The large Lady Banks rose in Arizona, rose rustling in Texas, Josephine's planting style at Malmaison, identification of Chinese roses, the wanderings of Robert Fortune, the "Mother Lode" of roses in California, and a private garden of 8,500 rose bushes sold because of a tax increase, are just a few of the tales told.

Even with so many tales in one book, the writing flows easily.  Dick Streeper states that it is "masterful storytelling", and that describes it perfectly.  If you love roses, you will find yourself unable to put this book down.

It is a classic.


Another classic book for rose lovers is How to Pronounce French Rose Names by Diana Bellucci.  The title states it all.  If you want to ask for a rose without stating "I'm not sure how to pronounce it, but it might be Du-sure or Dew-shay", then you can look it up and know that it's the latter.

Want to pronounce the rose Souvenir de Gilbert Nabonnand correctly?  Just look it up, and you will find that it is pronounced as soo-vneer duh zheel-behr nah-bo-na(n).  German roses are also listed, so you can pronounce Pink Frau Karl Druschki as fraow kahrl DROOSH-kee.  Even those of us with a southern drawl can feel confident knowing that we are pronouncing our rose names correctly!


(The rose photos are from last November.)  

Now it's your turn!  Please join us every 20th of the month with your own garden book review.  Any book with a gardening influence qualifies.

Monday, March 18, 2013

Playing it Cool

I went to my very first garden club meeting last week.  This is something I've been thinking about doing for quite some time.  I had just been putting it off.  Eventually, I was invited to come!  Invited!  Of course, I played it cool.  "Oh, I'll see if I can fit it in my schedule."  Inside, I was silently jumping for joy!


The other gardeners were so sweet.  Everyone seemed so interested in hearing about my garden.  They seemed like such a lovely group, and very knowledgeable about all things gardening.  I plan on returning - again and again!

During the meeting, there was a presentation on spring bulbs.  And I returned home with inspiration:
There was a photo of muscari bulbs planted in a rock wall.  It was beautiful.  The long greenery of the muscari hung down, while the blue bulbs reached up toward the sky.  I immediately knew - I want to do this in my garden.
They will look perfect planted in the cracks between the blocks in this area:


I've heard some garden clubs are not as nice.  But I thoroughly enjoyed this one.  And I got an idea for my garden!  It was hard not to squeal with delight.  But, I played it cool.  I simply said, "How lovely."


When autumn comes, I'll be playing it cool again.  I mean, I'll be playing in the cool weather - planting muscari bulbs in little cracks!  All the while, inside, I'll be laughing merrily!

Do you go to garden club meetings?

Saturday, March 16, 2013

March Performers

The weather has been full of ups and downs.  We will hit 80 degrees (26C) soon.  And yet, we are still below freezing most nights.  A lot of difference between last year's mild weather.  In fact, last year I had a rose blooming in February!

This year's weather has been more "normal" (as "normal" as weather gets, I suppose), while last year's was unusually warm.  The plants in my garden are blooming about one month later this year than last.

So, what did I have blooming for Garden Bloggers Bloom Day?

Well, all of the blooms from last month are still sweetly blooming.  The cool nights have helped the soil warm up slowly.  Spring snowflake, pansy, hellebores, cyclamen, camellia, daffodils, irises, phlox, muscari, rosemary, loropetalum, violets, scabiosa, and candytuft are all still blooming in my garden.  In fact, I was beginning to think there wouldn't be any new blooms to show this month.

That is, until I looked up.  The crabapples are just beginning to put on their spring show!

I just love these trees!  And the bees do, too!  It seems are if they are all lined up to purchase a ticket to see the new blooms.


But I think the bees are missing the best show in my garden.  The ferns have decided to emerge for Foliage Follow Up.


To me, ferns are nature's epitome of extravagance.  So many stems, each with so many leaves.  Each perfectly formed, each unfurling with exquisite timing and impeccable grace.  The ants get to see this beautiful trapeze act unfold.

They also get the added bonus of seeing some super hairy legs on those ferns!


So, they're not only the trapeze act, they're also the clowns.  Who would have ever thought that ferns were an entire circus rolled into one!

I can't wait to see what other performances will soon be showing up in my garden!


Thursday, March 14, 2013

A Happy Place

Do you have a "happy place"?  I do!  It's the garden center!  :)

And like most gardeners, I can't resist picking up an unplanned plant purchase or two while I'm there.

It makes me happy!


Last year, I purchased just one candytuft (iberis sempervirens).  I had never grown this plant in my garden, and wasn't sure where I could plant it.  My cart was already full, and my husband was patiently waiting for me to complete my selections and get to the ever-growing check-out line.  (I know how he feels.  When we go to the auto parts store, I patiently wait for him, and am oh-so-happy when we leave!)

I didn't have time right then to get more, because that would have required a decision of where they could be planted.  But one plant can always be squeezed in somewhere!  At least, that's how I rationalize it when I'm in my happy place.

So, I quickly put one in the cart.  Looking at its beautiful white blooms made me happy, and finding a spot to squeeze it into my garden made me happy, too.  But eventually the blooms faded away, and I forgot all about my candytuft.

Until this week.


This week, my candytuft has made my garden a very happy place.  It is blooming at the same time as my early irises.  They look so pretty together, and my garden almost glows as the white of the low candytuft plays off the white of the taller irises.

Candytuft grows in zones 3 or 4 through 9 in full sun to partial shade.  It is great for rock gardens, and I think it has found its own happy place next to the sidewalk in my garden.


But this one little plant, blooming so beautifully, has made me realize that I need more.  One is jut not enough!  Several lining the walkway would look much, much better.  

I guess you know what that means!  I will just have to go to my happy place - the garden center - again!   :)


Tuesday, March 12, 2013

Veggie Beds

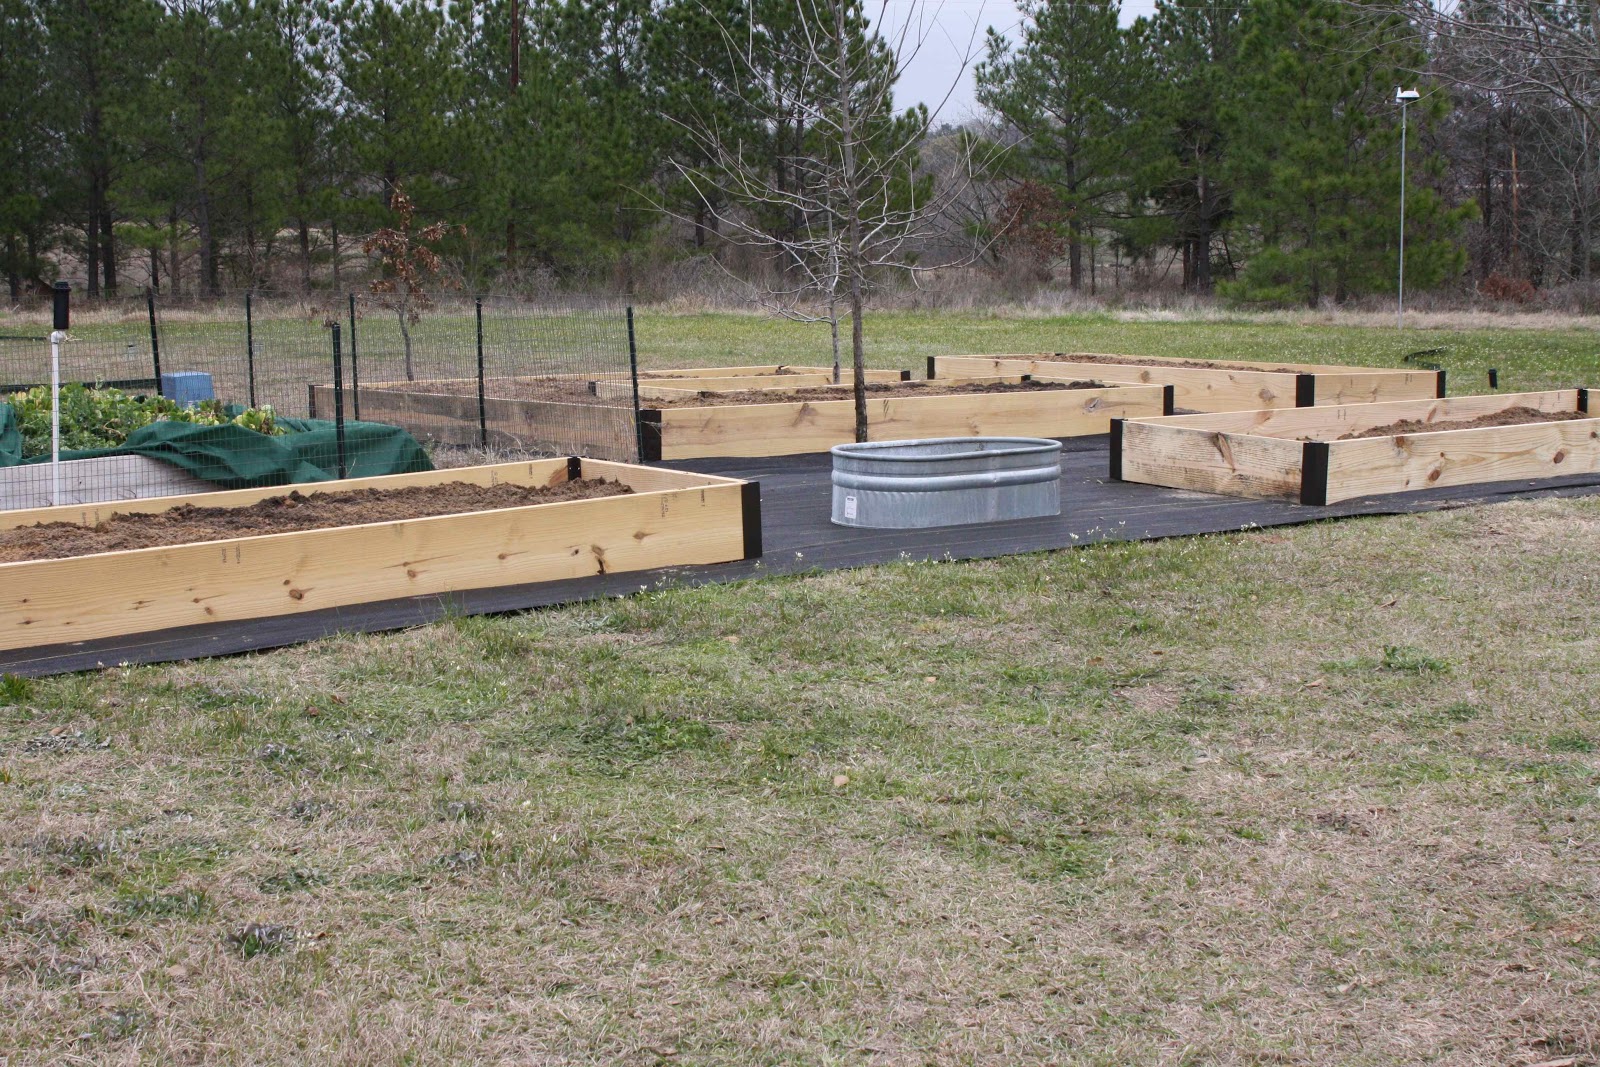
Want to start a vegetable garden?  Several people that I have met lately have been interested in doing just that.  But they were unsure where to start, and most were extremely interested in knowing how to make raised beds.  So, I promised them a post.

Step by step, with all my little tips and tricks added in, this is how to make a raised vegetable bed:

1.)  Start with a design.

It can be simple, or elaborate.  Just keep the beds to around 4 ft wide so that you can reach across easily to weed the bed and also to harvest your vegetables.

Looks like a puzzle!

2.) Figure out materials needed, and the co$t.

Raised beds are an investment, so figuring out the cost before you begin the project is very important.

3.)  What will be under your raised beds?

We have Bermuda grass, which is notorious for being extremely difficult to get rid of.  On my first set of raised beds, I only put down cardboard under the dirt in my raised beds, thinking that the grass would not be able to work its way through to the top.  I was wrong.  :(  Eventually, I removed those beds, and reconstructed them over pieces of steel roof panels, with weed fabric outlining the beds.  This has worked well.  This time, I thought it would be easier to use weed fabric inside as well as outside the beds.  I purchased the weed fabric from Gempler's.

Not sure I'm completely sold on the weed fabric for inside my beds.

However, I garden my vegetable beds organically, and I now wonder what kind of chemicals will be leaching out from the weed fabric.  So, that might be something to think about, too.  I think next time I'll go back to the roofing panels.

If you don't have Bermuda grass to worry about, you may be able to get by without some sort of barrier between your soil and your raised beds.  I've seen photos of raised beds next to green grass, without any concern of the homeowner having a problem with the grass taking over their raised beds.  How I wish I that would work for me!

And, if you don't want to put down weed fabric or roofing panels, it might be possible to remove the grass entirely before erecting your beds.

4.) Lay out your design, then put the beds together.

This is actually quite simple, because I use raised bed corners from Gardener's Supply.  Of course, you don't have to use these, but they make the construction extremely easy.  Personally, I can't even put four boards together and trust my own construction, so they were worth it to me.

The corners just screw into the boards

I used 1"x12"x whatever length I need.  Of course, you can use a shorter height if you prefer.  It depends upon which vegetables you'll be growing.  It also depends upon the base of your vegetable beds.  A base of weed fabric or roofing panels is different than a base of soil.  You may also want to use a mix of different heights for a more interesting design.

Use non-treated lumber.  I know most people use treated lumber when using boards outdoors.  However, treated lumber has chemicals you don't want leaching into your vegetables.  Since these boards are not treated, it's best not to put the beds up next to your house.  You don't want to introduce termites into your home, and a board touching your home would give the termites a direct route.

5.)  You're almost done!  Time to add the dirt.

You can purchase bags, but I try to buy in bulk, as it's more economical.  Here's some tips for buying in bulk:
 
Figure out how many cubic yards you will need.  Click HERE for a handy-dandy calculator for doing just that.

But don't worry - if you can't figure it out, the dirt supplier can figure it out for you.  Just be sure to have the measurements of your beds when you call or go by.

That tree will probably have to go at some point, or my beds moved.

Another tip for buying in bulk is to ask about their delivery charge.  Some will deliver for free, some will have a set charge.  I have found that this depends upon the company's own trucking situation.  Some have their own trucks.  Some must use a delivery service, which charges them.  Some companies will charge you for over a certain yardage amount, but might allow a small amount to be delivered free of charge.  Again, this depends upon their trucks and the number of yards of dirt their trucks will hold.  For example, you may be able to get nine yards of dirt delivered free, while 10 yards would cost you dearly.  Ask questions!

And, while you're buying soil, ask questions about it, too.  Here, most companies will offer you two different types of soil, with two different prices.  One is plain dirt.  Around here, that's mostly sand.  The other option is called "organic mix", "garden blend", or some other name, which is just sand mixed with wood shavings.  The first year, this vegetable bed will not perform any better than if you just had plain sand, but the second year it will break down to a nice quality.

After I have put the soil in the beds, I also rake in some organic fertilizer.  I purchase this in bags, and just add a bag or so to each bed.

My vegetable garden is tripling in size this year!

6.)  You're done!  But before you plant, there's one more thing you need to think about.

Do you need fencing?  I do.  We have deer that think our vegetable beds are their own salad bar.  It also helps to keep our cats out.  You don't want cats to use your vegetable beds as their litter box!  The cats and the deer could both easily jump over our fence, but they don't.  If you don't want to put up a fence, I would suggest a motion activated water scarecrow.  They really work!

7.)  Finally!  It's time to plant!  :)

I would suggest buying Mel Bartholomew's book on Square Foot Gardening.  It's not absolutely necessary, but it's worth a read.  And Gardener's Supply has an online kitchen garden planner for determining the number of plants for each square foot.  I love it!

My final piece of advice would be to start small.  You can always add more beds.  I started with three 4x4 beds.  It was the perfect beginning for me.  I eventually enlarged those beds, and now I'm adding even more.  But, starting out small gave me the confidence I needed.

My first set of raised beds.

Good luck to you!  All the work will be worth it when you taste your first  fresh-from-your-very-own-garden veggies!

Wednesday, March 6, 2013

A Field of Gold

Narcissus.  Daffodils.  Jonquils.  I'm certain that there's a great explanation for all those names, but here in East Texas, we just call them all daffodils.

I don't like daffodils.  Actually, I should clarify that.  I don't like daffodils in my garden.  Well, let me clarify that a little more.  I don't like yellow daffodils in my garden, at least, not very much.

It's complicated.

Last year, I was thrilled when the white daffodil 'Thalia' emerged at just the same time as my red dianthus began to bloom.  It was beautiful.

But, I've never wanted yellow daffodils in my garden.  I wasn't sure why.  I love yellow.  It's actually one of my favorite colors, so that wasn't it.  I love that yellow daffodils bloom early in the spring.  They are a welcome sight - outside of my garden.

Why don't I want them in my own garden?  I've been giving this a lot of thought lately, and I think I figured it out.


One of the Seasonal Celebrations I have always looked forward to in spring is going by the home in which my great-grandmother lived most of her adult life.  And where she planted a beautiful garden.  I can remember playing in her garden as a child.  I spent many summers there under her crape myrtle trees, playing in the dirt.  Now I always make a special trip to go by there in spring, because that's when the daffodils bloom.

Her birthday is March 7th, and I can imagine that she loved to see the daffodils blooming for her birthday.  She passed away in 1980, but her daffodils still continue to bloom each spring.  There are so many at her old homestead that that they have escaped out into the fields, and there they continue to thrive.  She has plain daffodils and fancy daffodils.  And some small ones that are probably some sort of species or natural hybrid.


The small ones have a scent that is wonderful.  Even on a windy day, you can smell their sweet fragrance.


These daffodils are survivors.  Not only have they escaped her yard, they have escaped the fields beside her house.  The road leading to her home is dotted with these same daffodils.  It makes me wonder how many years they have been growing.  How they managed to escape.  And how they continue to thrive with absolutely no care.

These have more rounded petals than the ones above.

I realized I love these daffodils.  So, why don't I like them in my own garden?  That was the question I asked myself over and over.


Then it dawned on me.


I love my great-grandmother's daffodils precisely because they are growing out in the field.  I love seeing them in the wild.  And that's when it hit me.

These daffodils have been blooming in the fields beside her home for so many years, that to me, that is how they should be grown.  Not in a garden.  But, in an open pasture.


Every year I think about digging up some of the daffodils that have escaped into the open fields.  But since I never wanted them in my garden, I never did.  But this year is different.  This year I want some of them.  I don't want them for my garden.  I want to put them in the fields that surround my home, just as they grow in the fields beside her home.

That is the Lesson Learned.  Plants have personal meaning and memories attached to them.  We should figure out what they are, and how and where that plant should be grown to preserve those memories.

I will finally love having yellow daffodils.  Because they were hers.  And they will be grown as her daffodils have grown for years - wild and free, in a field of gold.

I'm joining Donna at Gardens Eye View for Seasonal Celebrations, and Beth at PlantPostings for Lessons Learned.
Related Posts Plugin for WordPress, Blogger...