Step by step, with all my little tips and tricks added in, this is how to make a raised vegetable bed:
1.) Start with a design.
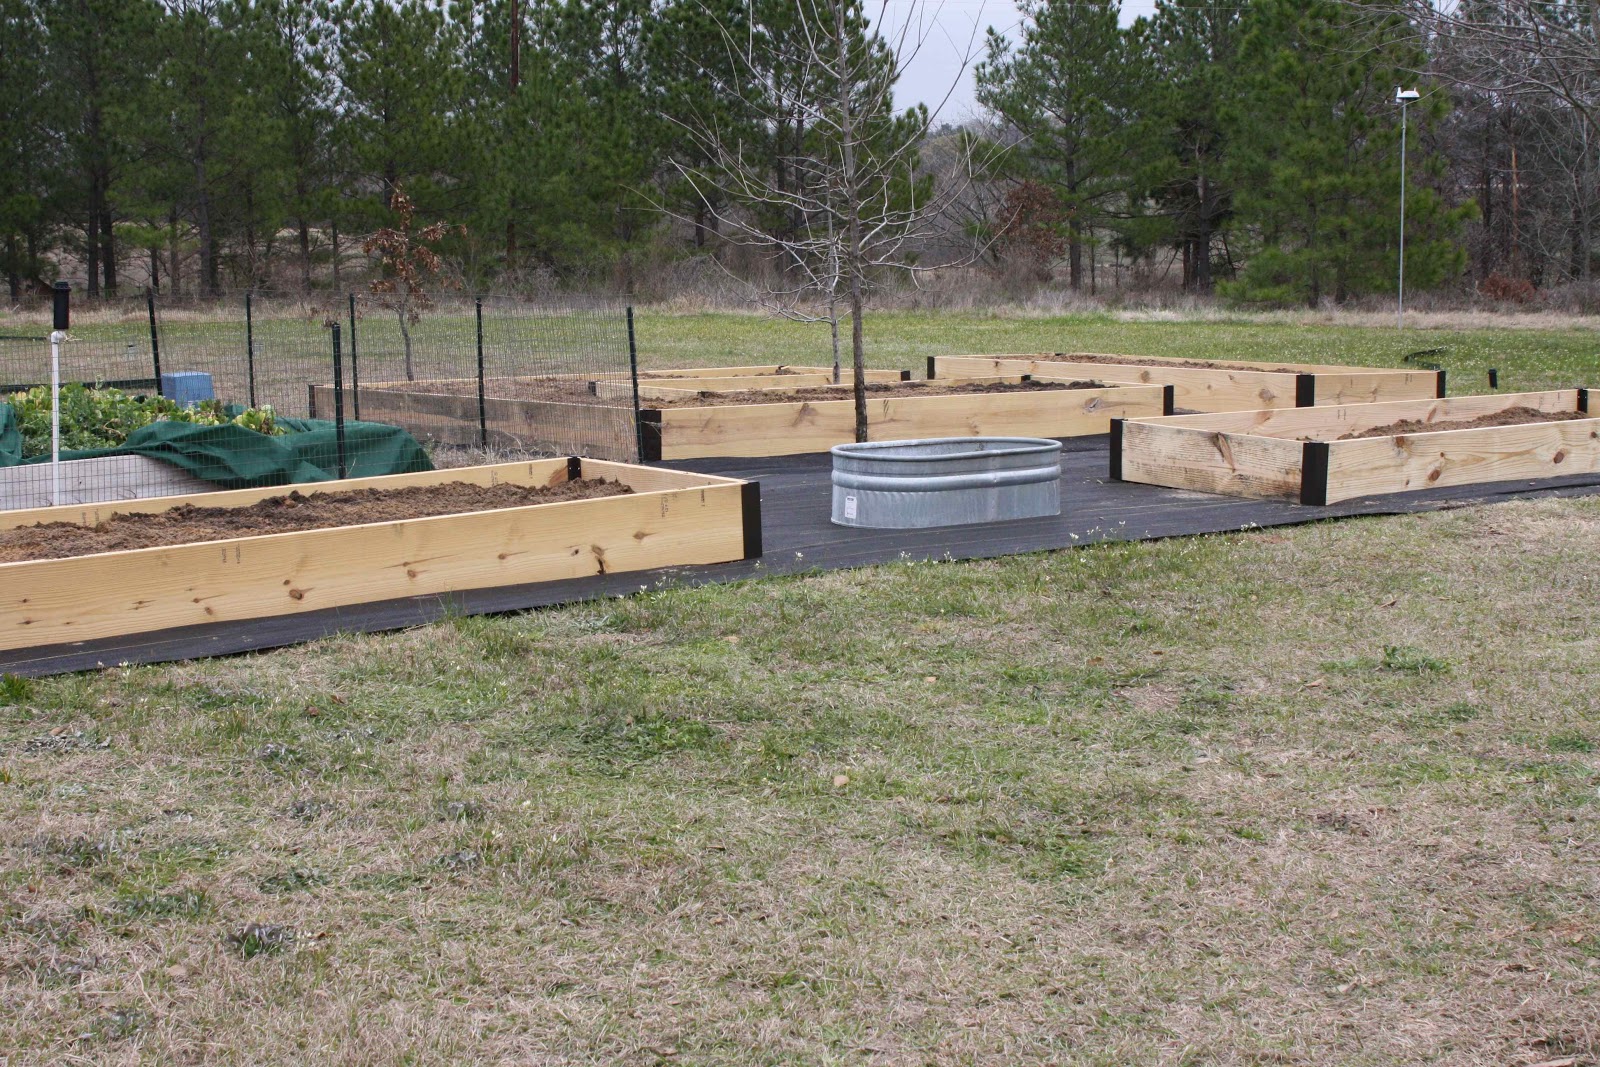
It can be simple, or elaborate. Just keep the beds to around 4 ft wide so that you can reach across easily to weed the bed and also to harvest your vegetables.
 |
| Looks like a puzzle! |
2.) Figure out materials needed, and the co$t.
Raised beds are an investment, so figuring out the cost before you begin the project is very important.
3.) What will be under your raised beds?
We have Bermuda grass, which is notorious for being extremely difficult to get rid of. On my first set of raised beds, I only put down cardboard under the dirt in my raised beds, thinking that the grass would not be able to work its way through to the top. I was wrong. :( Eventually, I removed those beds, and reconstructed them over pieces of steel roof panels, with weed fabric outlining the beds. This has worked well. This time, I thought it would be easier to use weed fabric inside as well as outside the beds. I purchased the weed fabric from Gempler's.
 |
| Not sure I'm completely sold on the weed fabric for inside my beds. |
However, I garden my vegetable beds organically, and I now wonder what kind of chemicals will be leaching out from the weed fabric. So, that might be something to think about, too. I think next time I'll go back to the roofing panels.
If you don't have Bermuda grass to worry about, you may be able to get by without some sort of barrier between your soil and your raised beds. I've seen photos of raised beds next to green grass, without any concern of the homeowner having a problem with the grass taking over their raised beds. How I wish I that would work for me!
And, if you don't want to put down weed fabric or roofing panels, it might be possible to remove the grass entirely before erecting your beds.
4.) Lay out your design, then put the beds together.
This is actually quite simple, because I use raised bed corners from Gardener's Supply. Of course, you don't have to use these, but they make the construction extremely easy. Personally, I can't even put four boards together and trust my own construction, so they were worth it to me.
 |
| The corners just screw into the boards |
I used 1"x12"x whatever length I need. Of course, you can use a shorter height if you prefer. It depends upon which vegetables you'll be growing. It also depends upon the base of your vegetable beds. A base of weed fabric or roofing panels is different than a base of soil. You may also want to use a mix of different heights for a more interesting design.
Use non-treated lumber. I know most people use treated lumber when using boards outdoors. However, treated lumber has chemicals you don't want leaching into your vegetables. Since these boards are not treated, it's best not to put the beds up next to your house. You don't want to introduce termites into your home, and a board touching your home would give the termites a direct route.
5.) You're almost done! Time to add the dirt.
You can purchase bags, but I try to buy in bulk, as it's more economical. Here's some tips for buying in bulk:
Figure out how many cubic yards you will need. Click HERE for a handy-dandy calculator for doing just that.
But don't worry - if you can't figure it out, the dirt supplier can figure it out for you. Just be sure to have the measurements of your beds when you call or go by.
 |
| That tree will probably have to go at some point, or my beds moved. |
Another tip for buying in bulk is to ask about their delivery charge. Some will deliver for free, some will have a set charge. I have found that this depends upon the company's own trucking situation. Some have their own trucks. Some must use a delivery service, which charges them. Some companies will charge you for over a certain yardage amount, but might allow a small amount to be delivered free of charge. Again, this depends upon their trucks and the number of yards of dirt their trucks will hold. For example, you may be able to get nine yards of dirt delivered free, while 10 yards would cost you dearly. Ask questions!
And, while you're buying soil, ask questions about it, too. Here, most companies will offer you two different types of soil, with two different prices. One is plain dirt. Around here, that's mostly sand. The other option is called "organic mix", "garden blend", or some other name, which is just sand mixed with wood shavings. The first year, this vegetable bed will not perform any better than if you just had plain sand, but the second year it will break down to a nice quality.
After I have put the soil in the beds, I also rake in some organic fertilizer. I purchase this in bags, and just add a bag or so to each bed.
 |
| My vegetable garden is tripling in size this year! |
6.) You're done! But before you plant, there's one more thing you need to think about.
Do you need fencing? I do. We have deer that think our vegetable beds are their own salad bar. It also helps to keep our cats out. You don't want cats to use your vegetable beds as their litter box! The cats and the deer could both easily jump over our fence, but they don't. If you don't want to put up a fence, I would suggest a motion activated water scarecrow. They really work!
7.) Finally! It's time to plant! :)
I would suggest buying Mel Bartholomew's book on Square Foot Gardening. It's not absolutely necessary, but it's worth a read. And Gardener's Supply has an online kitchen garden planner for determining the number of plants for each square foot. I love it!
My final piece of advice would be to start small. You can always add more beds. I started with three 4x4 beds. It was the perfect beginning for me. I eventually enlarged those beds, and now I'm adding even more. But, starting out small gave me the confidence I needed.
 |
| My first set of raised beds. |
Good luck to you! All the work will be worth it when you taste your first fresh-from-your-very-own-garden veggies!

Looks fantastic. My favorite step is # 7:) My problem is I want to plant everything, so we just added on to our raised beds.
ReplyDeleteYes, it becomes addicting, doesn't it? I'm hoping I will be able to plant most of what we need in these beds. But, I do wonder if later on I'll be adding on even more!
DeleteThat is a lot of space for your veggies, but with the harvest you had all Winter I don't blame you in the least. Nice job on the garden beds.
ReplyDeleteCher Sunray Gardens
I'm hoping this way I'll be able to rotate beds, with some for summer veggies, some for winter, etc. We'll see how the plan works out!
DeleteHolley, I always have problem with grass on my veg beds. Now I see you put the weed fabric. good idea. I will buy this fabric or something like it here! I love raised beds, my back feels better when I do something there.
ReplyDeleteThe grass can be relentless. It's amazing how much difference just a few inches off the ground makes to our backs, but it really does!
DeleteRaised beds are very practical, I'm going to make a few in my garden :)
ReplyDeleteGood luck! I love raising vegetables in them!
DeleteA really good post Holley, a handy step by step guide into making a vegetable patch/beds in ones own garden. And you've done a very neat job too. Hopefully this year will be a very bountiful one!
ReplyDeleteIt would be so nice to be able to grow most of what we eat. Not sure I'll ever achieve that goal, but I'm working toward it, at least!
DeleteHi Holley! I've been working on my raised beds this winter, adding lots of leaves and manure that have composted nicely! I now have lots of worms in the beds I've done this to! I can hardly wait to get started gardening this year! Have a nice day! Blessings from Bama!
ReplyDeleteYou were so smart to think ahead and get your soil nice before planting time! I'm very bad at putting things off until the last minute. I envy you those worms! :)
DeleteWonderful post! I don't have much sun here for a veggie garden (my small potager is nice, though). At my previous house, I started small like you did, and then moved on to a large, sunny plot. I miss that! Great instructions! I've used no-till gardening successfully when adding groundcovers, but I can imagine a veggie garden would be more challenging. I used newspaper, cardboard, compost, soil, and mulch for the "lasagna" layers. The grass never came back, but the ground cover loved it!
ReplyDeleteI use the lasagna layers for many of my flower beds, but I have to keep layering every year, and continually digging up grass because that Bermuda grass does not give up easily! But, oh, yes, those layers make the most beautiful black soil!
DeleteGreat information. Your raised beds look wonderful! We have a large vege garden but it is not raised. My hubby just tilled up a corner in the back yard. He does most of the vege stuff while I do most of the flower stuff.
ReplyDeleteFor the last couple of years, we've had a vegetable garden farther back where we just tilled, too. But it was being taken over by the grass, and starting to get shaded out by the pines, not to mention loved by the deer (too big to fence in), so we decided adding on to my raised beds would be the most practical. How nice that your hubby loves to garden, too!
DeleteGreat post with lots of good information! I am planning to create a vegetable garden myself this year, but on a slightly (much smaller) scale. I will make a post about it too :-)
ReplyDeleteI would have never started this large - it would have overwhelmed me. I'm hoping I'm satisfied with this amount of beds, and won't need to add on any more. But it becomes a bit addicting - if you have the room!
DeleteVery great advice for those interested in starting a veggie garden. Starting small is definitely the way to go...
ReplyDeleteHugs,
Betsy
So true, Betsy! I would have been overwhelmed if I hadn't started out very small. I'm glad I did - it's easier to add on than to give up and have to break it all down!
DeleteVery good advice. Dealing with bermuda grass is tough because it is so persistent.
ReplyDeleteLook forward to seeing your harvest.
Bermuda grass it the most frustrating thing in my garden. I have a few other weeds that frustrate me, but inot like the Bermuda grass. It seems I'm always in a battle with it!
DeleteGood post on creating beds. Bermuda is tough stuff. We have no grass by our beds so I'm good there. We used cinder blocks. Gives you a wide enough space to sit or walk around the beds.
ReplyDeleteCinder blocks! What a great idea! I hadn't thought of that, but I may have to start using it in the future! :)
DeleteReally wonderful... your last sentence is always my like. Add in without chemicals .... :) keep up the good work!
ReplyDelete"Without chemicals" is the reason I have a vegetable garden. If I could get organic vegetables at a reasonable price otherwise, I'm not sure I'd have nearly as big a vegetable garden as I do - or even one at all!
Deleteoooooooo....projects..I love to see projects
ReplyDeleteI always have several going on - rarely do I ever finish one! :O
DeleteGreat advice Holley. I started small as well and have enlarged too...Now if I want to enlarge again I have to go out into the grass which is OK actually...maybe next year, but we'll see if this garden can handle all I want to grow....I don't have a problem with grass growing into my beds but other invasive weeds that find a way no matter what I do.
ReplyDeleteI'm trying to reduce my grass, so enlarging my beds is one great way of doing that! I always have lots of weeds growing in my vegetable garden, but they are usually easy to pull. Not so much the grass - its roots go all the way down!
DeleteYahooo...my favorite topic :-). If you please don't mind, a good piece of advice is also to see the movement of the sun. Most vegetables prefer big sunny days; however, others like lettuce, spinach, other greens, cabbage, cauliflower, they would prefer some shade as too much sun and heat will make them bolt. That's a very important thing to remember while choosing the locations for vegetable garden.
ReplyDeleteVery good advice! Thanks for chiming in! As they say - location, location, location! :)
DeleteWhat a very comprehensive and detailed post. If I ever get round to giving them a try - I know where to come for reference!
ReplyDeleteI don't love my vegetables as much as I love my flowers, but I'm so glad I gave growing them a try. And since they only last a few months (most, anyway), I don't mine the failures as much as a shrub or a perennial that's supposed to last for years!
DeleteThis was a terrific post for me. I am ready to give up on growing vegetables in pots on the deck and have been deliberating about raised beds in the back yard. Now I have instructions!
ReplyDeleteI think you'll really enjoy having some raised beds. And think how much more you'll be able to grow!
DeleteGreat post. I like raised beds so that you don't have to bend over as much. I was fortunate enough to be taking apart a fence so I had all the wood I needed. Most people don't though, so your way is great. I like the corner brackets, they would come in handy if you don't have a square.
ReplyDeleteSee - I didn't even realize one would need a square to build this without those pre-made corners! Guess that's why everything I've ever built has fallen down!
DeleteThis is a wonderful post. I am keen on raised beds. My dear departed college roommate had a lovely blog , Let There Be Garden, which was devoted to her raised beds. She used cardboard instead of landscape cloth. I used newspaper which was thick enough to kill the weeds below until the newspaper broke down and then the plants could reach to China, so to speak!
ReplyDeleteI wish the cardboard would have worked for me. I thought it would, but the Bermuda is so very persistent. I've heard it will grow up 6 ft to the light if it has to! Not sure if that's an exaggeration, but it feels like the truth when you're dealing with it! :)
DeleteYour land is so awesome! And the space you have for your veggies literally made my heart skip a beat! What a cool design you have going there! I so like how artistic it looks!!
ReplyDeleteThanks! I like the design, too. And I have in my mind how I'll add on, if/when I ever need to do that, too! :)
DeleteYour new kitchen garden looks really smart - I hope the weed membrane works well for you. I seem to be getting away with just cardboard under mine, except for a few dandelions, but I have decided I will just eat the leaves and make sure I don't let them flower.
ReplyDeleteMy dandelions are starting to flower now! I'm trying to at least cut off the bloom stalks even if I don't have the time to pull them all up just now!
DeleteEverything looks beautiful, and I love the way you laid out the boxes! You are going to have so much fun!
ReplyDeleteOh, I hope my veggies do well this year! It's always fun if they do. Of course, if they don't, you know the saying: There's always next year! :)
DeleteGreat introduction! I started out with one bed ten years, and now I am maxed out at 9! The veggies are losing space to the dahlias! I am surprised that grass didnt die under the cardboard. I have some pretty invasive THINGS down by the pond where the beds are placed, but thick piles of newspaper have always kept everything at bay. Let's hope the ink in the newspaper isnt toxic! Oh well, the dahlias dont seem to mind!
ReplyDeleteThe grass here is horrible - I've read that Bermuda grass will grow up through six feet of soil to sprout! So, maybe it comes through the sides!
Delete